Language Selection


Not a quite typical article about colouring easter eggs
Here is the first real honest article about colouring easter eggs with natural colours! Never before, have I ever seen and read so many different instructions about colouring easter eggs with natural colours, than this year. Even we have asked Melanie from MINT to give us instructions about colouring easter eggs and there is one thing, which all of them share: It definitely sounds tremendously easy! My mom and I - you may know us from "Cooking with Kristina and Monika" - wanted to try it and now you can read our results here!
Project: Colouring easter eggs
Our project started off really good. Thanks to sufficient and good informations we soon knew how to make colours from natural ingredients:
- Red cabbage: blue
- Turmeric tea: yellow
- Blueberries: purple
- Beet: pink
- Spinach and stinging nettle: green
- Onion skin: orange
We even had most of the ingredients at home - how handy! Then we went for a walk and collected some young stinging nettles and spring flowers for beautiful patterns. We returned home to our snow white eggs.


The preparations
First of all, we prepared the colour decoctions. We cut all the ingredients into small pieces and made one pot, filled with water, for each ingredient until the water coloured in the respective colour. We added a splash of vinegar to every colour, so that the eggs soak up the colour better. Moreover, we wanted to make eggs with nice patterns on it, so we also prepared small cloths and the nets, where you buy the lemons in it and rubber bands, onion skins and the spring flowers.

The first try
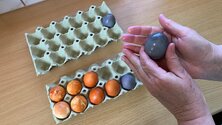
Until now, everything went as planned. The next step: cook the raw eggs in the colour decoction for about ten minutes. However, our plan definitely went wrong. The eggs, which were cooked in spinach and stining nettles, turmeric and beet did not soak up any colour and just stayed white. However, the eggs, which were cooked in blueberries and onion skins were coloured blue and orange, and looked really good. We were positively suprised.

For advanced: easter eggs with patterns
Of course, we wanted beautiful patterns on our easter eggs. We had three different instructions:
1. Put rubber bands around the eggs to create patters: the rubber bans dissolved and there were no patterns on the eggs.
2. Wrap the eggs with the net of the lemons: could have been super, if the eggs soaked up the colour - but they did not.
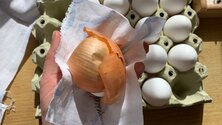
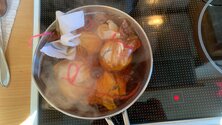
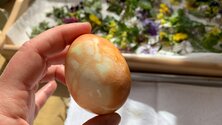
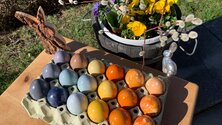
3. Wrap the eggs into a thin cloth or a snylon stocking and put spring flowers and onion skins in it (this variation requires a little bit of fine feeling). We cooked all of the eggs in the onion decoction and when they were cooked, we put them under cold water and let them dry for some minutes. The wraping of the eggs is a little bit difficult to describe, so here I have a picture story for you to understand easier:


The current result
We were really happy with the results of the instructions of number 3, so we decided to make a few more tries with this variation. Now we had already three different sorts of easter eggs: blue, orange and orange with patterns on it. However, we did not want to give up on all the other colours, and we still had a lot of cooked eggs, but they were all still white. So our plan was to let the decoctions get cold and put the eggs in it over the night. What more could go wrong anyways?

All's well that ends well
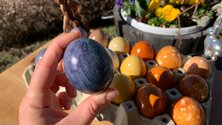
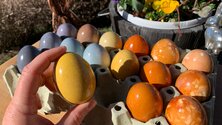
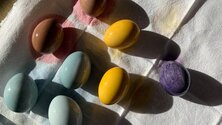
You cannot imagine, how happy we were the next day when we took the eggs out of the different colour pots. Over night, the eggs soaked up the colours of red carbage, turmeric and blueberries and now we had light blue, shining yellow and really beautiful purple eggs. However, spinach and stinging nettle and beet didn't meet our expectations. The eggs, which we put into the spinach and stinging nettle decoction were just light really, really light green, you didn't even see it properly. We thought that the eggs from the red carbage decoction were shining pink, but they only were boring brown. However, after all we can say that our naturally coloured eggs still look really nice! Finally we coated our eggs with a little bit of oil, so that they shine even brighter!


Our conclusion
We are really happy with our naturally coloured eggs, even though not all colours met our expectations. We really learned a lot about colouring easter eggs and the new plan for next year is ready to be tried out. We definitely colour our easter eggs with natural colours next year too! Here you see my two favourite eggs - let's see how they taste!